|
Large scale construction is no easy task for a novice. There’s a lot of things one should know before building a
house. A lot of things about how things are fastened together, for instance. I don’t mean screws vs. nails .I mean like.
How are floor joists held in position. And how is the roof connected. There’s so many places a person can take a wrong
turn in construction, and end up having to rebuild something. We decided it would be prudent to build a sample building. Particularly
since I have never built a building any larger than a dog house previously. So we gathered a few how to books. Which were
mostly useless. For the main reason that I am unschooled in the jargon of the trade. And more importantly I seem to be unable
to learn it. I am destined to not know the difference between a stay and a brace. Or fascia from a facade.
Luckily my former occupation . That of a concrete mixer truck driver. Gave me access to buildings in several stages of
construction. If I was stuck on a particular part of the project. I could look around and see how the professionals did it.
And If worse came to worse. I could ask said professional. And if he or she was the patient type. I could even get them to
use small words that even I could understand.
So we decided to build a storage shed to hone my admittedly non-existent skills. First we needed a size. We had a spot
selected so size wasn’t too much of an issue. It had to fit inside the selected spot obviously. It was at this time
that my boss, who also has a sawmill. Told me that he had 2 bundles of rough cut lumber that he would sell me cheap. As he
was going to move the mill, and didn’t want to leave the lumber behind. “rough cut” lumber is exactly as
it sounds. It’s lumber which hasn’t been planed down so has a rough texture. He told me it ranged from approximately
2x4 up to 2x 12 and all ten foot long. It was hardwoods . (oak and hickory mostly) but it also had some gum mixed in.
Well I always have my eye out for a bargain. Much to the chagrin of my Mrs. So I bought both bundles to build my shed.
And so had my first dimension. Our new shed would be 10 foot wide. For our second dimension I figured that the masonite siding
that I was planning on using for the exterior came in 4x 8 sheets so three sheets wide was twelve feet. Viola! Our second
dimension.
So we had our size , our spot, and lumber to start. Time to build. I decided to build the shed on piers as there was no
way we were going to able to get a concrete mixer to the site anytime soon to pour a footing. So I headed down to our local
lumberyard for the fist of many times. I bought a few 4x4 posts to use for the piers and some ‘quick crete’ to
fill in around them. Grabbed my posthole diggers and tape measure on my way through and headed off to start my shed.
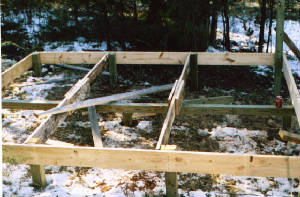
Once my posts were in the ground in the desired spot. By desired I must have meant trapezoidal in shape. After I started
building I realized that although the dimensions were truly 10 x 12. Any resemblance to a square ended there. But by then
it was too late to do anything about it except to deal with it as best I could.
Next I found out that the 10 foot long boards my boss sold me were in fact 9 ½ foot long. They were also about a quarter
inch narrower than a standard 2x4. Now if I were a smart man , and marginally less stubborn. I would have headed back down
to the lumberyard and bought the 2x10x10’s that I needed to build the floor.
But I am neither of the afore mentioned. I am a tinkerer. A make do-er. So make do I did. I cut my boards down to 5 feet,
and used the short pieces to splice two 5 footers together. I luckily had a center brace made from a 4x4 laid end to end already
installed in the floor frame of the shed to keep the center from sagging.
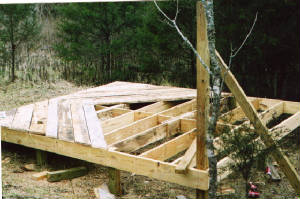
Once the floor joists were in, ugly as they were. It was time to cover them. I elected to use some more of the rough cut
boards as a sub floor. And laid them in in a “V” pattern instead of in a row. I then covered them with sheets
of ¼ inch luan. Which was a mistake. I should have used ½ plywood. Plywood would have given the floor a less spongy feel.
The luan allows the sub floor to flex. It was also at this time while laying the covering that I realized just how far out
of square my floor was. But I filed it away as something to watch out for when building the house. But It was a tremendous
pain during the entire construction of the shed. I was forever having to make bits and pieces to fill in gaps , and cutting
off edges to get rid of overhang. Ironically I learned that if you cut off an overhang on one side it would usually fit in
the gap on the other. Go figure.
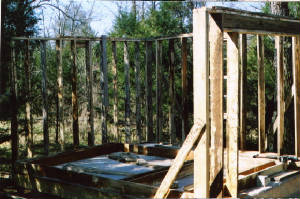
Time for walls. An acquaintance and fellow pilot had just remodeled his own house and had some old windows he offered to
me for next to nothing. As I said. I’m not one to pass up a deal. Since we were trying to build the shed as house like
as possible. It was a forgone conclusion that we were going to need to include windows. So I bought three of them. The walls
were surprisingly simple to build. I will mention I learned about using solid boards as headers over the doors and windows
and that saved me some possible trouble. I also learned that my rough cut boards were starting to warp into interesting shapes,
and it was starting to be impossible to drive nails and screws through the hickory and oak without bending or breaking the
nails and screws. I was given helpful advice like. “Spit on your nails and they’ll go through easier.” and
“Make sure you drive them in two or three good licks with the hammer.”. Helpful both. However it was the decision
to use all screw construction and pre drilling my holes which changed the tide. It also slowed things down. But I ultimately
triumphed and had four walls and a floor.
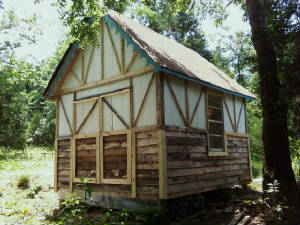
Time for a roof! I never realized how many different types of roofs there are. There’s barn roofs (discarded because
of the sheer heights it would reach) , flat roofs (leak), salt box ( complicated and just plain ugly ). hip roofs (no porch).
and your standard pitched roof. Even with the pitched roof. There’s many angles to choose from. I went with 12 in one
(That may not be the proper name.) in which the roof drops 12 inches for every 12 inches you move outward from center. This
gave a seriously steep pitch but it fit the look of the building I was going for and it had the added benefit that I figured
out that if I placed the butt end of a board to the side of another . It gave me the proper angle. Less angle cutting makes
me happy. I could just build braces out of scrap masonite and make a truss in no time. What I didn’t count on was that
once the roof was built. It was far too steep for me to get onto and it made a real chore out of laying the shingles. I had
to stand on the ladder lay all the shingle I could reach. Then move the ladder a couple feet and lay a few more. Then as the
saying goes. Rinse and repeat. Not to mention the shear hell of getting the plywood sheets up to cover the trusses before
any shingling or tar papering could begin. I’ll spare you the gory details but suffice it to say. Working on a shaky
ladder 12 foot in the air really sucks for someone who doesn’t like heights to begin with.
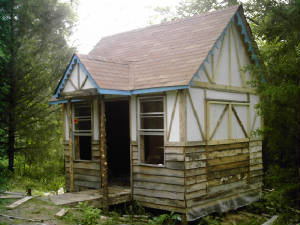
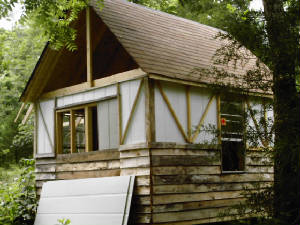
Finishing up. For the outside of the building I used masonite sheets that extend halfway down the wall. And used oak slats
lapped over each other in what in shipbuilding is called “clinker built”. In house construction I don’t
know what they call it. Nor if it’s even has a name. I used oak strips to trim it all up outside. And made some fancy
mutton boards at the eaves by outlining half a coffee can on a board then cutting out the half circle. To give it a cottagy
feel.
On the inside I lined my walls with left over tar paper from the roof.( In hopes it might slow down the rats and bugs).
Then covered the walls with drywall.. I then used more 2 inch wide oak slats that I cut up. To trim the edges, and place at
the drywall seems. Board and batten style. Which allowed me to have a finished look without having to tape the drywall.
One day. I was finishing up a little trim work and suddenly it occurred to me. I didn’t have anything else to do.
The shed was done. I was shocked. I was sure It would never be done. It certainly didn’t feel like it would ever be
done while I was working on it. I was both elated and apprehensive. I was elated the shed was finished. But apprehensive that
it would stand to the elements. There was something else gnawing at my insides. I just couldn’t place my finger on it
right then. It finally came to me. At 3 am the next morning. I awoke in a cold sweat. The practice building was done. It was
time to start on the main event. The house was waiting. I haven’t slept well since.
This article contributed by Brian Jett.
|